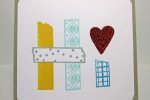
Today I want to share a brief overview on inking and masking techniques used with the tape strip stamps from the wonderful Hero Arts stamp set called Tape Your Message. Brand new for 2013, the clear set is a fun collection of Washi tape-style strips and journalling frames. I had fun experimenting with these and came up with two ways of stamping these images on a single layer card.
Each card is 3-1/2 inches square—the perfect size love note for a lunch bag or to attach to a candy treat. If you look at the “H” in the sentiment of each card, there is a difference. The card on the right shows a traditional masking technique and the card on the left shows an inking technique.
Let’s start with the card on the right:
The crossbar of the “H” was stamped first in Soft Granite shadow ink. I masked it with an image cut out of a sticky note and  then stamped the rest of the “H” in Butter Bar mid-tone shadow ink and in Soft Pool shadow ink. The lower part of the “I” was stamped in Pool mid-tone shadow ink.
The great thing about clear stamps is that you can see through them to get perfect placement of your images. (Note: click on image for larger pic. Sorry for the blurriness!)
Remove the yellow sticky note mask and voilà, it magically appears to be in front of the upright parts of the “H.”
The heart is a small heart from the Hero Arts Heart frame cuts. I cut double-sided sticky tape and sprinkled red glitter all over it. Burnish very well and most of the glitter will stay stuck to the sticky tape.
For some great tutorials and projects using the masking technique check out these links:
- Jennifer McGuire has a video of basic masking techniques here.
- Kristina Werner uses masking a lot. Here are a couple of videos here and here.
- Splitcoaststampers has a great short tutorial on masking here.
The card on the Left:
In real life, Washi tape is somewhat transparent, so the color of the item underneath it shows through a bit. In stamping it is hard to get a transparent look without stamping on vellum and cutting out the image. I wanted to see if I could achieve the look in one layer.
This time, start by inking up the vertical parts of the “H.” To make this easier, I have mounted both stamps on the same block, perfectly spaced.
Ink each stamp in a separate color.
Using a folded Ranger ink blending foam, tap the inked stamp where the crossbar should go. This will remove some, but not all the ink.
Stamp the image onto cardstock for your project.
There will be faded ink across each section. This is where you will line up the inked crossbar piece of Washi tape.
 Again, clear stamps make this very easy and allow for near perfect placement.
You can see that the crossbar piece of the stamped Washi tape appears to be somewhat translucent, as the other colors show through. (Sorry again for the blurriness!)
The heart on this card is also made with double-sided sticky tape, but it was punched out with the Stampin’ Up! Many Hearts punch (sadly discontinued).
Finally, ’cause I couldn’t leave well enough alone, I stamped this same design with no masking and no inking. The card panel is in the middle below. It still looks great, so sometimes techniques are not necessary.
This glittered heart on the middle panel has a layer of Stampin’ Up! Crystal Effects over the red glitter. Ranger’s Glossy Accents, or Judikin’s Diamond Glaze will give you the same effect.
Which technique do you think works/looks better?
Thanks for stopping by today!
Stephanie
Ingredients:
Stamps: Hero Arts Tape Your Message clear set
Ink: Hero Arts shadow inks in Butter Bar (mid-tone), Pool (mid-tone), Soft Pool, Soft Granite
Cardstock: Neenah Solar White, Stampin’ Up! Crumb Cake (kraft), Bazzill Date Swirl Smoothie
Dies: Hero Arts Heart Frame Cuts, Stampin’ Up! Many Hearts punch (discontinued)
Misc: Stampin’Up! Crystal Effects, Recollections/Michael’s red fine glitter, Post-it note, Ranger Ink Blending Foam


Comments
2 responses to “Two Takes on Hero Arts Washi Tape Stamps”
I love both of the techniques you used. I’m partial to the card on the left, as it keeps the translucent feel of washi tape! Great tips!
I featured this post on my Facebook page as Today’s Scrapbook Wonder. If you’d like to see it: http://www.facebook.com/ScrapbookWonderland